Настройки ресурса Файл
На этой странице более подробно рассматриваются настройки ресурса Файл после того, как вы добавите его в свой курс, а также связанные с этим настройки администрирования сайта.
Общее
- Укажите название файла и при необходимости составьте описание. Установите флажок, если вы хотите, чтобы описание отображалось на странице курса.
- Загрузите свой файл, нажав кнопку «Добавить» в поле «Выбрать файлы». Нажав на эту кнопку, вы попадете в окно выбора файлов, которое является названием области хранения файлов и доступа к ним в Moodle.
- Если вы видите поле со стрелкой, вы можете перетащить файл прямо со своего рабочего стола в Moodle.
Внешний вид
- Способ отображения
- Автоматически ― позвольте Moodle выбрать оптимальный вариант для вас.
- Встроить ― отобразить файл как часть страницы Moodle (изображения, PDF-файлы, видео)
- Принудительная загрузка ― заставить пользователя сохранить файл или открыть его в программе на своем компьютере.
- Открыть ― отобразить файл в браузере, но без оформления страницы Moodle (изображения, PDF-файлы, видео).
- Во всплывающем окне ― то же, что и "Открыть", но открывает новое окно браузера для отображения этого файла (без заголовка Moodle, блоков и т.д.). В этом окне браузера также отсутствуют все меню и адресная строка.
Другие параметры видны только в том случае, если администратор включил их в настройках сайта:
- В фрейме/рамке ― отобразить заголовок Moodle и описание файла, при этом файл будет отображаться в области, размер которой можно изменять.
- Новое окно ― очень похоже на "во всплывающем окне", но новое окно представляет собой полноценное окно браузера с меню, адресной строкой и т.д.
- Показать размер и тип
- Это может быть полезно для учащихся с ограниченной пропускной способностью Интернета, которым необходимо загрузить ваш контент. Начиная с версии 4.3 эта функция включена по умолчанию.
- Показывать дату загрузки/изменения
- Это может быть полезно, если вы регулярно обновляете содержимое. Отображать описание ресурса Если этот параметр включен, в поле описания над файлом будет отображаться любое содержимое. Если вы хотите, чтобы включенные мультимедийные файлы, такие как изображения и mp3, были встроены в файлы, выберите "все файлы" или "только HTML-файлы", в соответствии с вашими типами файлов.
Other settings
Depending on what is enabled for your site and course, you may also need to explore Common module settings, Restrict access, Activity completion, Tags and Competencies
Viewing and editing uploaded files
- Once uploaded, files appear as thumbnails in the file manager for easy recognition.
- Files view can be easily toggled between icons view or a table view with sizes and dates, or a hierarchical list view. See the documentation on the File picker for more information.
- Clicking on the name of an uploaded file opens up a pop up dialogue box which allows file details quickly to be altered.
Creating an alias/shortcut
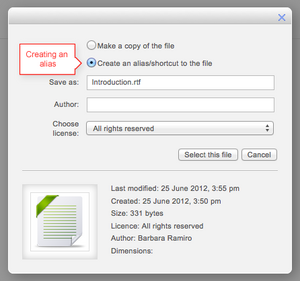
- When an uploaded file - or a file from the Private files, Dropbox, File system or EQUELLA repositories - is re-used elsewhere on Moodle, the teacher has the option to make a copy (a new, unconnected version) or to create a shortcut or alias.
- If an alias is created, then when the original file is updated, it will change in all instances of the alias. So a teacher might add course notes to their private files for example, and then add them into a number of courses. When the teacher makes an alteration in the file in their private files, this alteration will be reflected in all instances of the course notes.
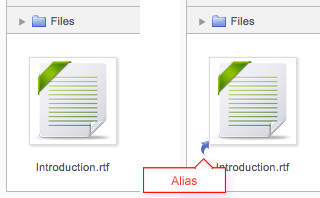
- An alias can be recognised by its thumbnail. See the difference in the screenshot below between the original file (left) and the alias (right):
- To update a file, go to its original location (for example Private files) and upload your new version with the same name . You will be prompted to override or rename the file. Choose "override" and this file will replace your original file and the alisas/shortcuts will remain and all be updated to your latest version.
 |
 |
Note: Aliases cannot be made in the following areas:
- an assignment submission
- a forum post attachment
- a workshop submission
- a quiz essay
- a database activity file field
This is to prevent cases such as a student uploading an item for assessment and then subsequently changing the original in their private files. When a student uses a file from their private files in one of these instances, they do not see the options to "copy" or "create an alias".
Extracting or unzipping a zipped archive file
If you uploaded a zip file into a File or Folder Resource, you can uncompress and expand it into its various files. To do this, go into Edit settings for the resource, right click on the file icon in the Select files area, and then click on the Unzip file button.
Displaying a website index page
The file module may be used if you have a folder with linked files such as a website with an index.html file, and optionally images, CSS style sheet files and JavaScript files.
- Click the 'Turn editing on' button at the top right of the course page
- Drag and drop the zipped folder onto the course section where you'd like it to appear, answer 'Create file resource' to the popup dialogue, then click the upload button
- Clicking the editing icon (hand with a pen) then click on the zip file and unzip it
- Click on the index.html file or the file you want to start displaying your linked files from then in the popup dialogue click the button 'Set main file'. This ensures this file is the one that appears on the course page for students to click on. The main file is then indicated with a title in bold.
- Click the button 'Save and display' at the bottom of the page
Site settings
The File resource has additional settings which may be changed by an administrator in Site administration > Plugins > Activity modules > File.
- Frame height allows you to specify the height of the top frame (containing the navigation) if you choose the "in frame" display option. Note: If your theme has a large header then the resource_framesize variable should be increased to prevent horizontal and vertical scrollbars.
- Available display options: By default Moodle doesn't enable "New window" or "In frame", so you need to set them available here if required, and you can also disable other options if not applicable.
The following capabilities relate to the file resource:
de:Datei konfigurieren es:Configuraciones del recurso archivo