Краткое руководство по оценкам в Moodle: различия между версиями
мНет описания правки |
Нет описания правки Метка: визуальный редактор отключён |
||
| Строка 9: | Строка 9: | ||
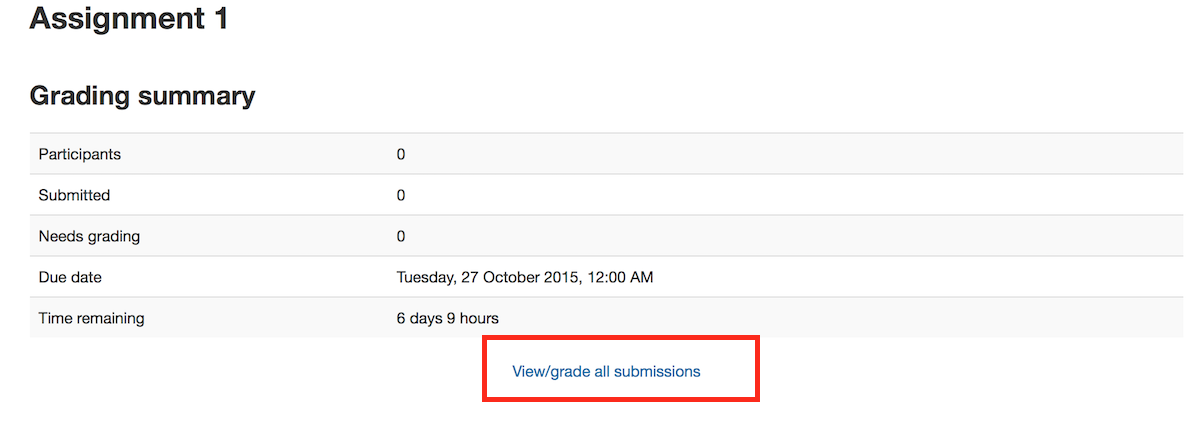
Если при оценивании задания учащийся отправляет материалы в Moodle (файл/текст и т.д.), то лучше всего указывать оценки в самом задании. В задании нажмите «Просмотреть/оценить все отправленные материалы». | Если при оценивании задания учащийся отправляет материалы в Moodle (файл/текст и т.д.), то лучше всего указывать оценки в самом задании. В задании нажмите «Просмотреть/оценить все отправленные материалы». | ||
[[ | [[Файл:AssignmentPage.png]] | ||
На следующей странице вы увидите, где можно редактировать оценки и отзывы, а также просматривать работы учащихся. Вверху страницы находится выпадающий список. Здесь у вас есть возможность загрузить все работы учащихся. Это очень полезно, если студенты прислали эссе или другие файлы. | На следующей странице вы увидите, где можно редактировать оценки и отзывы, а также просматривать работы учащихся. Вверху страницы находится выпадающий список. Здесь у вас есть возможность загрузить все работы учащихся. Это очень полезно, если студенты прислали эссе или другие файлы. | ||
[[ | [[Файл:downloadfile.png]] | ||
=== Поиск материалов, готовых к оценке === | === Поиск материалов, готовых к оценке === | ||
Таблицу учащихся можно отсортировать, щелкнув по заголовкам столбцов. Если дважды щелкнуть по заголовку столбца «Статус», все задания, которые необходимо оценить, будут отсортированы и размещены в верхней части страницы. | Таблицу учащихся можно отсортировать, щелкнув по заголовкам столбцов. Если дважды щелкнуть по заголовку столбца «Статус», все задания, которые необходимо оценить, будут отсортированы и размещены в верхней части страницы. | ||
[[ | [[Файл:grid.png]] | ||
===Entering grades=== | ===Entering grades=== | ||
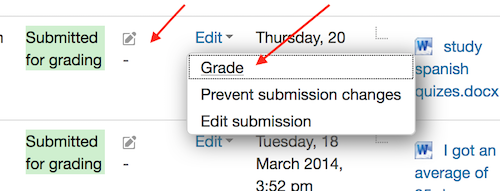
Then use the pencil icon in the Grade column or click on Edit and Edit Grade to get the to grading page for that particular student. | Then use the pencil icon in the Grade column or click on Edit and Edit Grade to get the to grading page for that particular student. | ||
[[ | [[Файл:edit2.png]] | ||
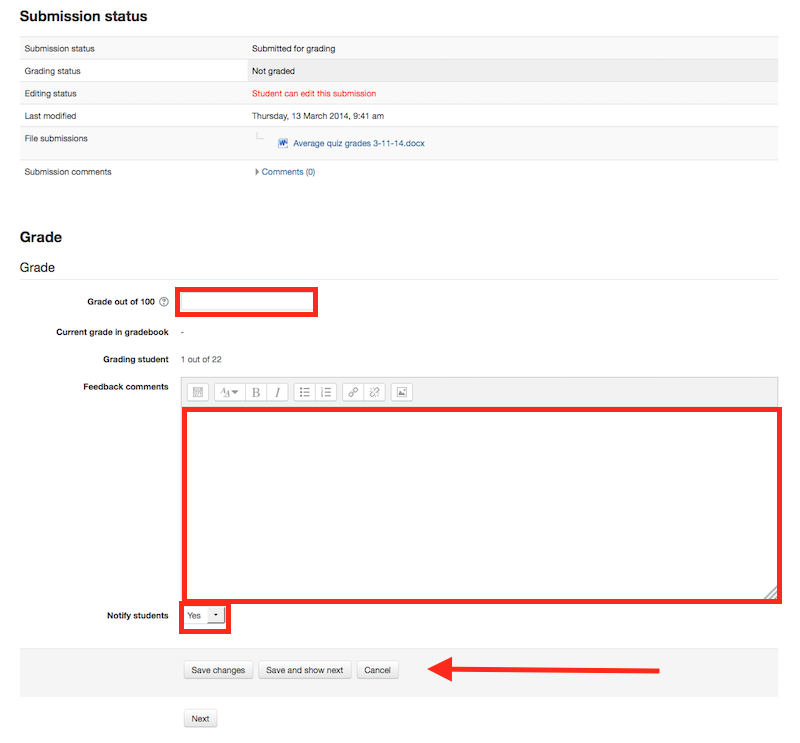
On the following page, you can enter a grade, enter feedback, and select whether to notify the student or not. When finished, be sure to click on Save. The Save and Show Next button will save the grade for this student and move to the grading page for the next student. | On the following page, you can enter a grade, enter feedback, and select whether to notify the student or not. When finished, be sure to click on Save. The Save and Show Next button will save the grade for this student and move to the grading page for the next student. | ||
[[ | [[Файл:entergrade.png]] | ||
==Grading from the Grader Report== | ==Grading from the Grader Report== | ||
| Строка 32: | Строка 32: | ||
The grader report is the main overview of the grade-book, showing all grades in a grid for the entire course. It can be accessed from the Administration menu under Course Administration. | The grader report is the main overview of the grade-book, showing all grades in a grid for the entire course. It can be accessed from the Administration menu under Course Administration. | ||
[[ | [[Файл:menu.png]] | ||
===Entering grades=== | ===Entering grades=== | ||
To add grades directly into the grader report, Editing needs to be turned on (button is in the top right hand corner.) Once Editing is turned on, each cell in the grid will have one or two entries boxes depending on how your grade-book is set up. The box to the left surrounded by a solid border line is for the grade, the second box with a dashed border line is for feedback. | To add grades directly into the grader report, Editing needs to be turned on (button is in the top right hand corner.) Once Editing is turned on, each cell in the grid will have one or two entries boxes depending on how your grade-book is set up. The box to the left surrounded by a solid border line is for the grade, the second box with a dashed border line is for feedback. | ||
| Строка 40: | Строка 40: | ||
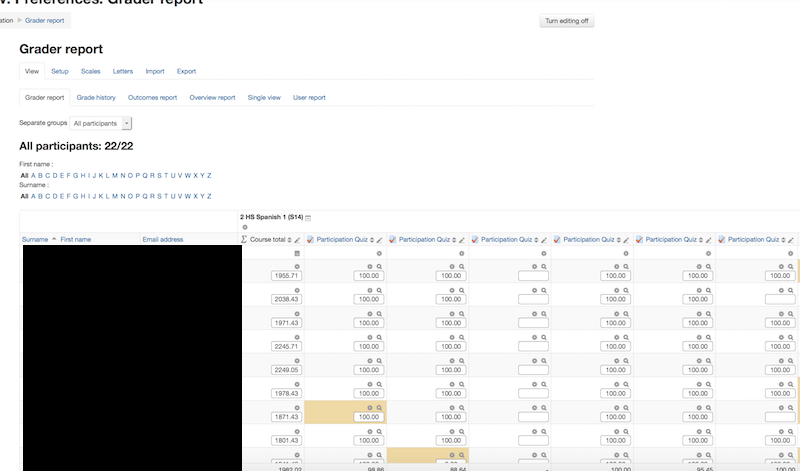
When grades are entered on this page, the cell will be shaded yellow or orange. This means that the grade has been overridden from the gradebook directly and any changes made from the Assignment Grading page will not be reflected in the grade-book. | When grades are entered on this page, the cell will be shaded yellow or orange. This means that the grade has been overridden from the gradebook directly and any changes made from the Assignment Grading page will not be reflected in the grade-book. | ||
[[ | [[Файл:grader.png]] | ||
==Grading from the Single View Tab in the Grader Report== | ==Grading from the Single View Tab in the Grader Report== | ||
| Строка 56: | Строка 56: | ||
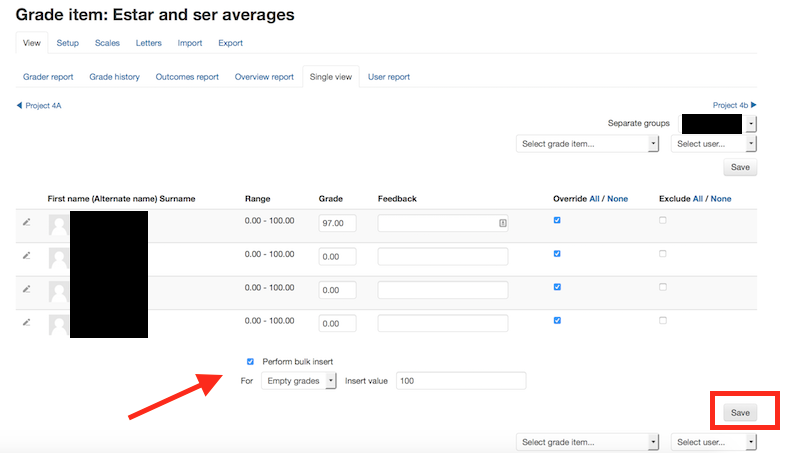
Once done, click on Save to update the grades. | Once done, click on Save to update the grades. | ||
[[ | [[Файл:single.png]] | ||
Версия от 10:14, 17 марта 2025
Это руководство предназначено для преподавателей и всех тех, кто будет выставлять оценки учащимся. Оценки можно вводить в нескольких местах в Moodle. Выбор наилучшего места для ввода оценок зависит от того, что вы оцениваете. У каждой области есть свои преимущества. Преимущество ввода оценок по заданию в том, что учащемуся будет отправлено уведомление о выставленной оценке. Этого не произойдет, если оценка редактируется в журнале оценок или на экране одиночного вида.
Перед началом
Если вы хотите скрыть оценки и отзывы учащихся до предварительной даты, вам нужно будет либо скрыть оценки в журнале оценок, либо использовать рабочий процесс выставления оценок. В противном случае оценки будут отображаться учащимся по мере их сохранения одна за другой.
Выставление оценки на странице задания
Переход к интерфейсу оценки упражнений
Если при оценивании задания учащийся отправляет материалы в Moodle (файл/текст и т.д.), то лучше всего указывать оценки в самом задании. В задании нажмите «Просмотреть/оценить все отправленные материалы».
На следующей странице вы увидите, где можно редактировать оценки и отзывы, а также просматривать работы учащихся. Вверху страницы находится выпадающий список. Здесь у вас есть возможность загрузить все работы учащихся. Это очень полезно, если студенты прислали эссе или другие файлы.
Поиск материалов, готовых к оценке
Таблицу учащихся можно отсортировать, щелкнув по заголовкам столбцов. Если дважды щелкнуть по заголовку столбца «Статус», все задания, которые необходимо оценить, будут отсортированы и размещены в верхней части страницы.
Entering grades
Then use the pencil icon in the Grade column or click on Edit and Edit Grade to get the to grading page for that particular student.
On the following page, you can enter a grade, enter feedback, and select whether to notify the student or not. When finished, be sure to click on Save. The Save and Show Next button will save the grade for this student and move to the grading page for the next student.
Grading from the Grader Report
Accessing the Grader Report
The grader report is the main overview of the grade-book, showing all grades in a grid for the entire course. It can be accessed from the Administration menu under Course Administration.
Entering grades
To add grades directly into the grader report, Editing needs to be turned on (button is in the top right hand corner.) Once Editing is turned on, each cell in the grid will have one or two entries boxes depending on how your grade-book is set up. The box to the left surrounded by a solid border line is for the grade, the second box with a dashed border line is for feedback.
In most sites, grades are saved automatically as they are entered but the page might need to be refreshed to see the Course Total update with the new grades. In some sites, there will be a Save button in the bottom left hand corner of the page.
Overridden grades
When grades are entered on this page, the cell will be shaded yellow or orange. This means that the grade has been overridden from the gradebook directly and any changes made from the Assignment Grading page will not be reflected in the grade-book.
Grading from the Single View Tab in the Grader Report
The "Single View" was added in Moodle 2.8. It is an interface that allows a teacher to add grades in bulk for a specific activity or a specific student. The single view adds grades directly to the Grader Report and all grades entered through this page are considered to be "Overridden", meaning that they cannot be changed from the Assignment or Activity specific grading interface.
Accessing the Single View
The Single View can be accessed in many ways. If your grade-book has tabs or a dropdown list at the top for accessing Setup, etc., there will be an option there to access the Single View screen.
There is also a pencil icon at the top of each column in the grader report by the activity name that will take you to the Single View page for that activity and another pencil icon in a column directly to the right of the student name that will take you to the Single View for that particular student.
Entering Grades
On the page that appears, you need to check the Override checkbox to the right of the grade that you want to change. If you are bulk entering grades, you can click on All at the top of this column to allow all grades to be changed at once.
At the bottom of the page, if you check the Perform Bulk Insert checkbox, you can then enter a grade and it will be entered for every grade that you have selected to override or for just the grades that are empty (select the appropriate option from the dropdown box).
Once done, click on Save to update the grades.
