Добавление нового курса: различия между версиями
| Строка 38: | Строка 38: | ||
* Вам необходимо удалить очень большой курс. | * Вам необходимо удалить очень большой курс. | ||
== | ==Сортировка курсов== | ||
Курсы могут быть отсортированы администратором или менеджером в меню Администрирование > Курсы > Управление курсами и категориями. | Курсы могут быть отсортированы администратором или менеджером в меню Администрирование > Курсы > Управление курсами и категориями. | ||
Версия от 12:44, 4 января 2025
Добавление курса
По умолчанию обычный преподаватель не может добавить новый курс. Чтобы добавить новый курс в Moodle, у вас должны быть права/роль администратора, создателя курсов or управляющего. Чтобы добавить курс:
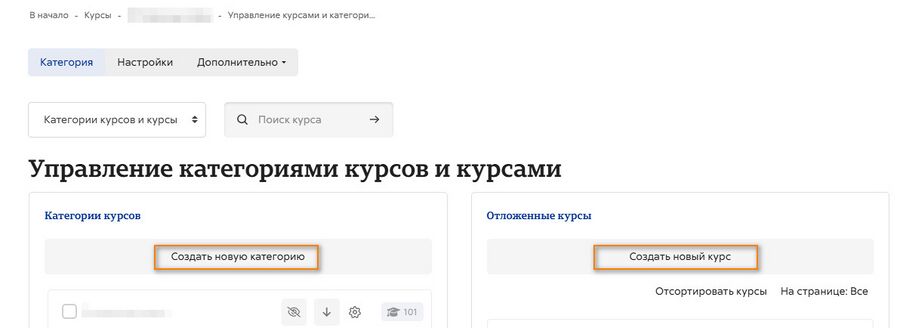
- Перейдите по ссылке Администрирование сайта, выберите Курсы > Управление курсами и категориями

- Нажмите на категорию, в которой вы хотите разместить свой курс. Для получения дополнительной информации смотрите Категории курсов.
- Нажмите на ссылку «Создать новый курс».
- На открывшейся странице нового курса введите его настройки, а затем выберите «Сохранить и вернуть», чтобы вернуться к своему курсу, или «Сохранить и показать», чтобы перейти к следующему экрану.
- На следующем экране, если вы выбрали «Сохранить и показать», платформа предложит вам выбрать студентов /преподавателей для прикрепления к курсу.
Удаление курса
Преподаватели не могут удалять курсы. Менеджеры (т.е. пользователи с ролью, для которых разрешена функция moodle/course:delete) могут удалять курсы, а создатели курсов могут удалять курсы, созданные ими самими, но только в течение 24 часов с момента создания курса. Это сделано для того, чтобы курсы, созданные по ошибке, можно было удалить без обращения к администратору.
Администраторы всегда могут удалить курсы.
Чтобы удалить курс (в качестве администратора или менеджера):
- Перейдите по ссылке Администрирование сайта, выберите Курсы > Управление курсами и категориями
- Выберите категорию курса и выберите нужный курс на экране справа.
- Нажмите на ссылку Удалить.
Вы можете удалить несколько курсов с помощью:
- Создаем новую (временную) категорию. Вы можете назвать ее, например, «Для удаления».
- Выберите и переместите курсы, подлежащие удалению, в соответствующую созданную категорию («Для удаления»).
- Удалите категорию («Для удаления») и выберите «Удалить ВСЕ — отменить нельзя».
У создателей курсов нет пользовательского интерфейса для удаления созданных ими курсов; однако они могут сделать это, отредактировав URL-адрес курса с помощью http://yourmoodlesite.net/course/view.php?id=N на http://yourmoodlesite.net/course/delete.php?id=N (заменив 'view' на 'delete').
Удаление курса с помощью CLI-скрипта
Администратор, имеющий доступ к командной строке, может удалять курсы, запустив скрипт.
Дополнительная информация о проблеме с отслеживанием MDL-74991
Это полезно, если:
- На вашем рабочем сайте не удается удалить курс, и вы не можете устранить причину;
- Вам необходимо удалить очень большой курс.
Сортировка курсов
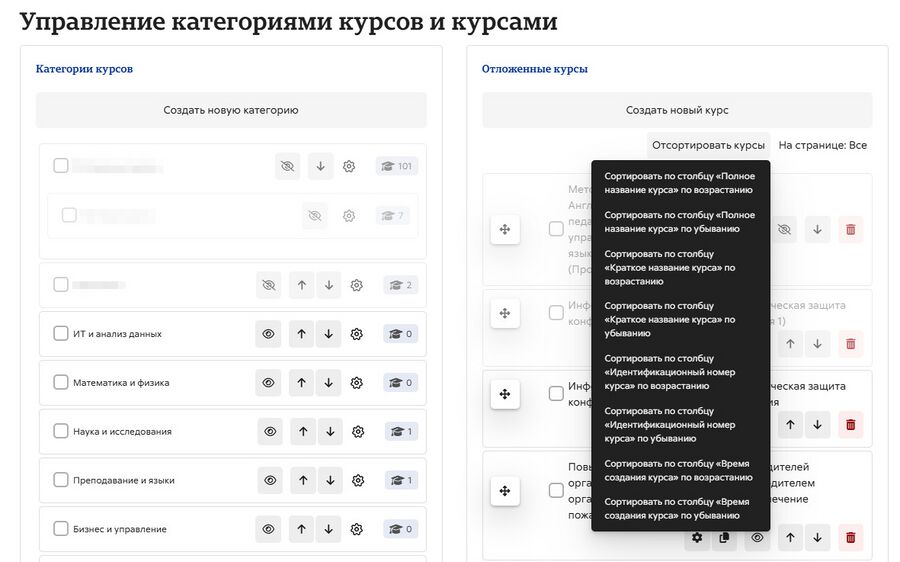
Курсы могут быть отсортированы администратором или менеджером в меню Администрирование > Курсы > Управление курсами и категориями.
Курсы могут быть отсортированы по возрастанию/убыванию названий, id (если есть) и по времени создания.

Course requests
The course request feature can be enabled by an administrator in Administration > Site administration > Courses > Course request.
An admin can set the default category for course requests, whether users can select a category when requesting a course, and who can receive notification of course requests (from a list of users with the capability moodle/site:approvecourse).
A user who is able to request a course can do this from the three dots on the My Courses page.
If course requests are enabled, by default all authenticated users can make course requests. See Course requester role for details of how to restrict users who can make course requests.
Automatically approving course requests
A plugin Course auto-approve allows for courses to be automatically approved.
Bulk course creation
For full details on how to bulk create courses and use course templates, see Upload courses.
- Go to Administration > Site Administration > Courses > Upload courses.
- Upload a CSV file either by dragging and dropping or using the button to select from the File picker.
- Select your import options and click Preview. If the settings are acceptable, click Upload.
Course templates
It is possible, from Administration>Site Administration>Courses>Upload courses to specify a course and settings to use as template for future courses.
Default blocks for new courses can also be configured in config.php.
Using an existing course as a template
First, create or locate on your Moodle the course you wish to use as a template and make a note of its shortname. A template course might for example have common headings or section summaries or policy agreements used throughout the site for consistency.
Note that only the content of the course will be restored; not its settings. Settings are added separately.
Method 1
- Create your csv file. See Upload courses for accepted fields.
- From the Site administration link, click Courses>Upload courses and add your file.
- Preview it and scroll down to 'Course process'. In the box 'Restore from this course after upload', add the shortname of your template course.
- If you are creating several courses using the same template and you wish them all to have the same settings, you can specify these in the Default course values.
- Upload your csv file.
Method 2
- All the settings and the chosen template course can be specified in the csv file you create. Use templatecourse as the field for your chosen template course, and use the course shortname. See Upload courses for full list of fields you can include.
- Here is an example of a csv file for restoring a course to be used as a template. It specifies for example the theme, language, enrolment method and alternative names for student and teacher.
shortname,fullname,category,newsitems,theme,lang,format,enrolment_1,enrolment_1_role,role_student,role_teacher,templatecourse
Knit,Knitting,2,0,afterburner,fr,topics,manual,student,NewKnitter,MasterKnitter,OMT
- Go to Administration>Site administration>Courses>Upload courses and add your csv file.
Using a backup course as a template
It is possible during the process of creating courses with a csv file in Site administration>Administration>Courses>Upload courses to specify and upload a backup file to be used as a template.
- Create your csv file. See Upload courses for accepted fields.
- From Site administration>Administration>Courses>Upload courses, add your file.
- Preview it and scroll down to 'Course process'. In the box 'Restore from this file after upload', add the backup file you wish to use as the template.
- If you are creating several courses using the same template and you wish them all to have the same settings, you can specify these in the 'Default course values' section.
- Alternatively, you can specify the course settings (such as format, enrolment methods, language) in the csv file. This method is useful if you wish different courses using the same template to have different settings.
- Upload your csv file.
Using the course templates plugin
With emeneo's course templates plugin you can very easily create template based courses. More information and the plugin package you can find here: https://moodle.org/plugins/local_course_templates
See also
Screencasts
Forum discussions
- Using Moodle Hide Courses from some users or students forum discussion
de:Kurs anlegen es:Añadiendo un nuevo curso eu:Ikastaroak (Kudeatzaileak) fr:Ajouter un cours ja:新しいコースを追加する